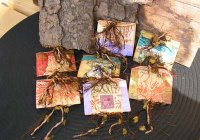
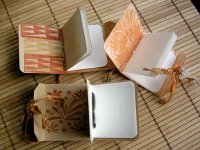
 If you ever need a nice gift tag in a hurry, try making some of these mini tag-bookies. They look great, and they are incredibly quick and easy to make from whatever scraps you have lying around.
Take a baggage label/shipping tag. I used 12 x 6 cm (which is around 5 x 2.5 inches), and I wouldn't recommend anything smaller than that, really, or else it gets too fiddly. You can use larger tags though, if you have them. If you don't have tags, simply cut a piece of card to tag size, trim off the corners and punch a hole at one end.

Lay the tag in front of you with the end with the hole to the left, long edge at the top and bottom. Score and fold the tag just to the right of the hole, so you have a little flap with a hole in it. Measure the rest of the tag, from the score line to the right edge, and score another line at the halfway point. Fold the tag. You'll now have a little booklet.
My tag was 12cm long. I scored and folded 2cm from the left edge, just to the right of the hole. That left me with 10cm of tag. I scored again at 5cm and folded the booklet.

Time to do the background. Open out your booklet and lay it flat again. I filled in the backgrounds by stamping the tags on both sides then overstamping with the same stamp but a different colour of ink. Between the two colours of ink and the two or three increasingly lighter impressions you can get from one ink-up, that's a lot of shading and variety, and makes for impressive visual effects. I finished off by running a chalk ink pad around the edges. This is such a small, fast step, but it makes one heck of a difference to the appearance of an item.
The next step is to make a card or signature for the inside of the booklet, so you have something to write on. Cut some paper or card just a little smaller than the main part of your tag. The main part of my tag measured 10cm x 6cm, so I cut my paper to 9cm x 5cm. Lay the papers on top of each other and then fold them in half, so the narrow edges meet.
Lay this "booklet" inside your tag bookie, take an awl or a large sharp needle, and punch three holes through all layers, right in the fold. Thread up a needle with some waxed thread, bookbinding thread, or fibres, then sew the pages and tag cover together using a simple pamphlet stitch. I started my pamphlet stitch from the outside, because I wanted to have trailing threads on the outside as embellishment.
Here's an easy-to-follow pamphlet stitch "how to" (pdf)
www.booklyn.org/education/ispamphlet.pdf

Embellish the covers with scraps of paper, postage stamps, beads, or whatever else you have in your stash. Loop a length of fibre through the tag hole, and there you are! You can make a dozen of these in an hour on a wet afternoon. And don't they look just great?


4 comments:
These are just great!!! Thanks for sharing the idea and technique :-)
WOW Susan!
This is a great little project! Thanks for the "how-to"!! I am going to try it - AFTER I move!
Delicious!
Brilliant idea - thanks for sharing, and for the link - I definitely want to give these a try!
Post a Comment