skip to main |
skip to sidebar
 This little box is only 8cm (around 3.5 inches) high. I picked up a stack of twelve nested cardboard boxes at the el-cheapo for only 2.99 euros! The three smallest boxes fit nicely into a carton.
I covered and lines the boxes with old print then painted them with sand, naples yellow, and red ochre, shabby chic style. I applied rub-ons to the box bases and braid to the rims of the box tops. The smallest box is crowned by a trio of cherubs, and the entire box stands on four little wooden feet.Art In A Carton: http://art-in-a-carton.blogspot.com/
 I'm tidying and reorganising my stuff at the moment (again...), and in the process, I re-discovered a cardboard cone I picked up sometime way back. The cone fits nicely into a milk carton, so I did it up yesterday and will pack it into one of the ready-to-roll cartons.
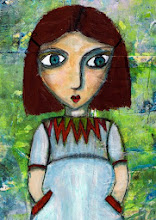
The main part of the background is a page from a 1939 French magazine. The woman is (a scan) from a vintage postcard in my collection. Her name is Valeska. The rest of the embellishments are scraps of gold mesh, German scrap, wooden buttons, lace, fibres and tags. The filling contains some vintage looking balls dusted with gold, off-white paper roses, more gold mesh, tags, and a ribbon bow.
I liked the outcome so much that I was tempted to keep it, but... one of the ideas behind Art In A Carton is to use up my stash and spread some enjoyment, so into a carton it will go!
 I've had a couple of emails lately asking me what the cartons look like and what artists might do to them to turn trash into treasure. So, I decided to post a few examples to this blog and to Art Angelix. Here are examples of the cartons I have here all packaged and ready to go out to the next artists who sign up for Art In A Carton.
I started out by painting each of these three cartons with two coats of black gesso. For the carton on the left, I stippled bronze metallic paint onto the black background using a sponge. When that was all dry, I pulled out my glue gun and dribbled lines and squiggles on each of the four sides. First, I let the glue dry and cool, then I dry brushes over the glue ridges with copper and then bronze acrylic paint and dabbed leftover paint into some of the spaces in the pattern. Can you say "easy peasy"?
The center carton also has a black and bronze stippled background. Then I glued on a band of gold foil and gold tissue. The bottom edge of the band is finished with fabric trim. I then layered on some gold mesh ribbon, which I attached on two sides using simple gold brads from the office supply store. As a final touch, I matted a clipped cabinet card, added an eyelet and some yarn, and attached the photo cars with foam tape.
The carton on the right has hand drawn and Cuttlebug embossed panels overlaid with peach and pink tissue. This is topped by a length of gold mesh ribbon attached by brads on all sides. Two of the brads have die cut flowers. I finished off by knotting yard to the mesh.
Want one? All you have to do is become an Art In A Carton artist! Just read the instructions, send me an email, and you can be the owner of one of these or the other cartons a few days from now.Art In A Carton: http://art-in-a-carton.blogspot.com/
 This little box is only 8cm (around 3.5 inches) high. I picked up a stack of twelve nested cardboard boxes at the el-cheapo for only 2.99 euros! The three smallest boxes fit nicely into a carton.