skip to main |
skip to sidebar
This is another item from the package I prepared for a friend. I need to send the package off a second time. First time around, I used packing tape that was a little too slick and the stamps detached themselves in transit, so the package was returned to me. Oh well, sigh.
The person who'll get this was one of the travelling artists on the first TAG journey. She'll be taking part in the next journey, as well. What you see here is something I created to make the journey more interesting. The substrate is a canvas. I drew the hills, painted them, and then wrote a message along the outlines. For the next step, I covered matchboxes in map paper, added a brad as a drawer pull, then glued the boxes around the edge of the canvas. Each of the boxes contain a sealed message with an invitation to do something that will add to the story.
This is on its way to a friend of mine who shall remain nameless, until the package has arrived. There are a couple of other items in the package, which I'll post in a day or so.
The substrate for this is simply cereal box card. One: recycling is always a good idea and two: the package was sent out the country, which means paying by weight, so it was good to have this lightweight material. Tip: For a sturdier substrate, simply glue two pieces of card together with gel medium.
I covered the substrate in crumpled tissue, to get some structure, then painted, stamped and stenciled the background.
I drew the fairy freehand and then coloured her using acrylic paint, Caran D'Ache neocolour II crayons and Spectrum Noir markers.
After that, I wrote the little story. Colouring in the loops in any writing makes text pop on a canvas or art journal page.
Earlier this year I signed up for 21 Secrets.
One of the teachers this year is Cathy Bluteau, who teaches a class that combines collage and doodling. This is one of the collages I created during her class.
The collage and doodle combination is right up my street. After getting a feel for Cathy's easy-to-follow technique, I incorporated zentangles, doodles and some of the lettering techniques I learned in Joanne Sharpe's online Letter Love 101 class, which I took at the beginning of this year.
The background colour blocks are Spectrum Noir markers. Lesson learned: don't use them on watercolour paper, as that kind of paper sucks up the ink. I wouldn't mind as much if the Spectrum Noir refills were easily available in Germany, but that's not the case. Next time I'll use Pan Pastels or Caran D'Ache watercolour crayons.
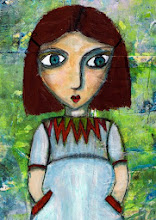
This is my new signature image. For years I proclaimed that I couldn't draw, especially not figures. Then, late last year I decided that this view of things was entirely contrary to what I actually believe and what I preach when I teach. So, I spent some time on my favourite waste of time, Pinterest, and looked at the kind of figures I thought might be do-able. After a while looking around, I picked up my pencil and started practicing whimsical faces and figures. I was amazed at how easy it was!
The next step came after I signed up for 21 Secrets. One of the classes was about painting whimsical figures. I wasn't sure about the painting aspect at first, because it seemed a lot less controllable than drawing, but I jumped in and tried it, and was delighted with my outcomes.
This painting actually looks a little like me, so I decided to use it as my online image, when I need one.
I can't believe how long it's been since I last posted. A lot of life got in my way over the past two and a half years, with extreme challenges and upheavals that turned my life into something barely recogniseable to me for long stretches.But I'm feeling brave now, and I've decided to revive my blogs and some of the larger projects I had running.
Today's post is just a little - well, not so little - poster I made as a "card" for a friend's upcoming birthday. It's slightly larger than A4.
The substrate is the backing from a paper pad. I first rubbed on, direct to paper, two shades of pigment ink in blue tones - Adirondack Earthtones "Stream" and Color Box "Glacier Lake", then stamped the visible border using a Dylusions flower stamp and black Stazon. Once it was dry, I coloured some of the flowers using Pitt Pens.
The central panel is Bristol paper coloured with two shades of Derwent Inktese pencils. I only bought those last week, and now I understand why everyone raves about them. The colours pop! Then I drew a double frame (black fineliner) and filled in the spaces with patterns.
The fairy was drawn freehand on a separate scrap of paper, coloured and cut out. After I had decided where I wanted her to go, I stuck her on using gel medium, then I wrote the story. As a final detail, I added the doodles that look like musical notes.
To finish up, I punched two holes, threaded through some sea green wire and added a bow.